“ErrorUtils caught an error:
Subsequent non-fatal errors won’t be logged; see https://fburl.com/debugjs.”
Fix :
goto console and run
localStorage.clear()
then reload facebook page
“ErrorUtils caught an error:
Subsequent non-fatal errors won’t be logged; see https://fburl.com/debugjs.”
Fix :
goto console and run
localStorage.clear()
then reload facebook page
There is a way to set the Response Limit using the IIS Manager:
The big Pro is that you can edit the properties for everything, not only PHP plus you can work with different versions (or even installations of the same version) of PHP.
The Apache HTTP server is the most widely-used web server in the world. It provides many powerful features including dynamically loadable modules, robust media support, and extensive integration with other popular software.
In this guide, we’ll explain how to install an Apache web server on your Ubuntu 20.04 server.
Before you begin this guide, you should have a regular, non-root user with sudo privileges configured on your server. Additionally, you will need to enable a basic firewall to block non-essential ports. You can learn how to configure a regular user account and set up a firewall for your server by following our Initial server setup guide for Ubuntu 20.04.
When you have an account available, log in as your non-root user to begin.
Apache is available within Ubuntu’s default software repositories, making it possible to install it using conventional package management tools.
Let’s begin by updating the local package index to reflect the latest upstream changes:
sudo apt update
Copy
Then, install the apache2 package:
sudo apt install apache2
Copy
After confirming the installation, apt will install Apache and all required dependencies.
Before testing Apache, it’s necessary to modify the firewall settings to allow outside access to the default web ports. Assuming that you followed the instructions in the prerequisites, you should have a UFW firewall configured to restrict access to your server.
During installation, Apache registers itself with UFW to provide a few application profiles that can be used to enable or disable access to Apache through the firewall.
List the ufw application profiles by typing:
sudo ufw app list
Copy
You will receive a list of the application profiles:
OutputAvailable applications:
  Apache
  Apache Full
  Apache Secure
  OpenSSH
As indicated by the output, there are three profiles available for Apache:
It is recommended that you enable the most restrictive profile that will still allow the traffic you’ve configured. Since we haven’t configured SSL for our server yet in this guide, we will only need to allow traffic on port 80:
sudo ufw allow 'Apache'
Copy
You can verify the change by typing:
sudo ufw status
Copy
The output will provide a list of allowed HTTP traffic:
OutputStatus: active

To                         Action      From
--                         ------      ----
OpenSSH                    ALLOW       Anywhere
Apache                     ALLOW       Anywhere
OpenSSH (v6)               ALLOW       Anywhere (v6)
Apache (v6)                ALLOW       Anywhere (v6)
As indicated by the output, the profile has been activated to allow access to the Apache web server.
At the end of the installation process, Ubuntu 20.04 starts Apache. The web server should already be up and running.
Check with the systemd init system to make sure the service is running by typing:
sudo systemctl status apache2
Copy
Output● apache2.service - The Apache HTTP Server
     Loaded: loaded (/lib/systemd/system/apache2.service; enabled; vendor preset: enabled)
     Active: active (running) since Thu 2020-04-23 22:36:30 UTC; 20h ago
       Docs: https://httpd.apache.org/docs/2.4/
   Main PID: 29435 (apache2)
      Tasks: 55 (limit: 1137)
     Memory: 8.0M
     CGroup: /system.slice/apache2.service
             ├─29435 /usr/sbin/apache2 -k start
             ├─29437 /usr/sbin/apache2 -k start
             └─29438 /usr/sbin/apache2 -k start
As confirmed by this output, the service has started successfully. However, the best way to test this is to request a page from Apache.
You can access the default Apache landing page to confirm that the software is running properly through your IP address. If you do not know your server’s IP address, you can get it a few different ways from the command line.
Try typing this at your server’s command prompt:
hostname -I
Copy
You will get back a few addresses separated by spaces. You can try each in your web browser to determine if they work.
Another option is to use the Icanhazip tool, which should give you your public IP address as read from another location on the internet:
curl -4 icanhazip.com
Copy
When you have your server’s IP address, enter it into your browser’s address bar:
http://your_server_ip
You should see the default Ubuntu 20.04 Apache web page
This page indicates that Apache is working correctly. It also includes some basic information about important Apache files and directory locations.
Now that you have your web server up and running, let’s go over some basic management commands using systemctl.
To stop your web server, type:
sudo systemctl stop apache2
Copy
To start the web server when it is stopped, type:
sudo systemctl start apache2
Copy
To stop and then start the service again, type:
sudo systemctl restart apache2
Copy
If you are simply making configuration changes, Apache can often reload without dropping connections. To do this, use this command:
sudo systemctl reload apache2
Copy
By default, Apache is configured to start automatically when the server boots. If this is not what you want, disable this behavior by typing:
sudo systemctl disable apache2
Copy
To re-enable the service to start up at boot, type:
sudo systemctl enable apache2
Copy
Apache should now start automatically when the server boots again.
When using the Apache web server, you can use virtual hosts (similar to server blocks in Nginx) to encapsulate configuration details and host more than one domain from a single server. We will set up a domain called your_domain, but you should replace this with your own domain name. If you are setting up a domain name with DigitalOcean, please refer to our Networking Documentation.
Apache on Ubuntu 20.04 has one server block enabled by default that is configured to serve documents from the /var/www/html directory. While this works well for a single site, it can become unwieldy if you are hosting multiple sites. Instead of modifying /var/www/html, let’s create a directory structure within /var/www for a your_domain site, leaving /var/www/html in place as the default directory to be served if a client request doesn’t match any other sites.
Create the directory for your_domain as follows:
sudo mkdir /var/www/your_domain
Copy
Next, assign ownership of the directory with the $USER environment variable:
sudo chown -R $USER:$USER /var/www/your_domain
Copy
The permissions of your web roots should be correct if you haven’t modified your umask value, which sets default file permissions. To ensure that your permissions are correct and allow the owner to read, write, and execute the files while granting only read and execute permissions to groups and others, you can input the following command:
sudo chmod -R 755 /var/www/your_domain
Copy
Next, create a sample index.html page using nano or your favorite editor:
sudo nano /var/www/your_domain/index.html
Copy
Inside, add the following sample HTML:/var/www/your_domain/index.html
<html>
    <head>
        <title>Welcome to Your_domain!</title>
    </head>
    <body>
        <h1>Success!  The your_domain virtual host is working!</h1>
    </body>
</html>
Copy
Save and close the file when you are finished.
In order for Apache to serve this content, it’s necessary to create a virtual host file with the correct directives. Instead of modifying the default configuration file located at /etc/apache2/sites-available/000-default.conf directly, let’s make a new one at /etc/apache2/sites-available/your_domain.conf:
sudo nano /etc/apache2/sites-available/your_domain.conf
Copy
Paste in the following configuration block, which is similar to the default, but updated for our new directory and domain name:/etc/apache2/sites-available/your_domain.conf
<VirtualHost *:80>
    ServerAdmin webmaster@localhost
    ServerName your_domain
    ServerAlias www.your_domain
    DocumentRoot /var/www/your_domain
    ErrorLog ${APACHE_LOG_DIR}/error.log
    CustomLog ${APACHE_LOG_DIR}/access.log combined
</VirtualHost>
Copy
Notice that we’ve updated the DocumentRoot to our new directory and ServerAdmin to an email that the your_domain site administrator can access. We’ve also added two directives: ServerName, which establishes the base domain that should match for this virtual host definition, and ServerAlias, which defines further names that should match as if they were the base name.
Save and close the file when you are finished.
Let’s enable the file with the a2ensite tool:
sudo a2ensite your_domain.conf
Copy
Disable the default site defined in 000-default.conf:
sudo a2dissite 000-default.conf
Copy
Next, let’s test for configuration errors:
sudo apache2ctl configtest
Copy
You should receive the following output:
OutputSyntax OK
Restart Apache to implement your changes:
sudo systemctl restart apache2
Copy
Apache should now be serving your domain name. You can test this by navigating to http://your_domain, where you should see something like this:
Now that you know how to manage the Apache service itself, you should take a few minutes to familiarize yourself with a few important directories and files.
/var/www/html: The actual web content, which by default only consists of the default Apache page you saw earlier, is served out of the /var/www/html directory. This can be changed by altering Apache configuration files./etc/apache2: The Apache configuration directory. All of the Apache configuration files reside here./etc/apache2/apache2.conf: The main Apache configuration file. This can be modified to make changes to the Apache global configuration. This file is responsible for loading many of the other files in the configuration directory./etc/apache2/ports.conf: This file specifies the ports that Apache will listen on. By default, Apache listens on port 80 and additionally listens on port 443 when a module providing SSL capabilities is enabled./etc/apache2/sites-available/: The directory where per-site virtual hosts can be stored. Apache will not use the configuration files found in this directory unless they are linked to the sites-enabled directory. Typically, all server block configuration is done in this directory, and then enabled by linking to the other directory with the a2ensite command./etc/apache2/sites-enabled/: The directory where enabled per-site virtual hosts are stored. Typically, these are created by linking to configuration files found in the sites-available directory with the a2ensite. Apache reads the configuration files and links found in this directory when it starts or reloads to compile a complete configuration./etc/apache2/conf-available/, /etc/apache2/conf-enabled/: These directories have the same relationship as the sites-available and sites-enabled directories, but are used to store configuration fragments that do not belong in a virtual host. Files in the conf-available directory can be enabled with the a2enconf command and disabled with the a2disconf command./etc/apache2/mods-available/, /etc/apache2/mods-enabled/: These directories contain the available and enabled modules, respectively. Files ending in .load contain fragments to load specific modules, while files ending in .conf contain the configuration for those modules. Modules can be enabled and disabled using the a2enmod and a2dismod command./var/log/apache2/access.log: By default, every request to your web server is recorded in this log file unless Apache is configured to do otherwise./var/log/apache2/error.log: By default, all errors are recorded in this file. The LogLevel directive in the Apache configuration specifies how much detail the error logs will contain.
Edit /etc/resolv.conf
add:
nameserver 8.8.8.8
nameserver 8.8.4.4/etc/systemd/resolved.conf[Resolve]
DNS=1.1.1.1 8.8.8.8
FallbackDNS=8.8.4.4
service systemd-resolved restartsystemd-resolve --statusthe output should look like this:
Global
         DNS Servers: 1.1.1.1
                      8.8.8.8
...One way to stop Network Manager from adding dns-servers to /etc/resolv.conf file is to do this. So first open the nm conf file /etc/NetworkManager/NetworkManager.conf:
sudo vim /etc/NetworkManager/NetworkManager.conf
And add this to the [main] section:
dns=none
Save and exit.
Virtual Network Computing, or VNC, is a connection system that allows you to use your keyboard and mouse to interact with a graphical desktop environment on a remote server. It makes managing files, software, and settings on a remote server easier for users who are not yet comfortable with the command line.
In this guide, you’ll set up a VNC server with TightVNC on an Ubuntu 20.04 server and connect to it securely through an SSH tunnel. Then, you’ll use a VNC client program on your local machine to interact with your server through a graphical desktop environment.
To complete this tutorial, you’ll need:
By default, an Ubuntu 20.04 server does not come with a graphical desktop environment or a VNC server installed, so you’ll begin by installing those.
You have many options when it comes to which VNC server and desktop environment you choose. In this tutorial, you will install packages for the latest Xfce desktop environment and the TightVNC package available from the official Ubuntu repository. Both Xfce and TightVNC are known for being lightweight and fast, which will help ensure that the VNC connection will be smooth and stable even on slower internet connections.
After connecting to your server with SSH, update your list of packages:
sudo apt update
Copy
Now install Xfce along with the xfce4-goodies package, which contains a few enhancements for the desktop environment:
sudo apt install xfce4 xfce4-goodies
Copy
During installation, you may be prompted to choose a default display manager for Xfce. A display manager is a program that allows you to select and log in to a desktop environment through a graphical interface. You’ll only be using Xfce when you connect with a VNC client, and in these Xfce sessions you’ll already be logged in as your non-root Ubuntu user. So for the purposes of this tutorial, your choice of display manager isn’t pertinent. Select either one and press ENTER.
Once that installation completes, install the TightVNC server:
sudo apt install tightvncserver
Copy
Next, run the vncserver command to set a VNC access password, create the initial configuration files, and start a VNC server instance:
vncserver
Copy
You’ll be prompted to enter and verify a password to access your machine remotely:
OutputYou will require a password to access your desktops.

Password:
Verify:
The password must be between six and eight characters long. Passwords more than 8 characters will be truncated automatically.
Once you verify the password, you’ll have the option to create a view-only password. Users who log in with the view-only password will not be able to control the VNC instance with their mouse or keyboard. This is a helpful option if you want to demonstrate something to other people using your VNC server, but this isn’t required.
The process then creates the necessary default configuration files and connection information for the server. Additionally, it launches a default server instance on port 5901. This port is called a display port, and is referred to by VNC as :1. VNC can launch multiple instances on other display ports, with :2 referring to port 5902, :3 referring to 5903, and so on:
OutputWould you like to enter a view-only password (y/n)? n
xauth:  file /home/sammy/.Xauthority does not exist

New 'X' desktop is your_hostname:1

Creating default startup script /home/sammy/.vnc/xstartup
Starting applications specified in /home/sammy/.vnc/xstartup
Log file is /home/sammy/.vnc/your_hostname:1.log
Note that if you ever want to change your password or add a view-only password, you can do so with the vncpasswd command:
vncpasswd
Copy
At this point, the VNC server is installed and running. Now let’s configure it to launch Xfce and give us access to the server through a graphical interface.
The VNC server needs to know which commands to execute when it starts up. Specifically, VNC needs to know which graphical desktop environment it should connect to.
The commands that the VNC server runs at startup are located in a configuration file called xstartup in the .vnc folder under your home directory. The startup script was created when you ran the vncserver command in the previous step, but you’ll create your own to launch the Xfce desktop.
Because you are going to be changing how the VNC server is configured, first stop the VNC server instance that is running on port 5901 with the following command:
vncserver -kill :1
Copy
The output will look like this, although you’ll see a different PID:
OutputKilling Xtightvnc process ID 17648
Before you modify the xstartup file, back up the original:
mv ~/.vnc/xstartup ~/.vnc/xstartup.bak
Copy
Now create a new xstartup file and open it in a text editor, such as nano:
nano ~/.vnc/xstartup
Copy
Then add the following lines to the file:~/.vnc/xstartup
#!/bin/bash
xrdb $HOME/.Xresources
startxfce4 &
Copy
The first line is a shebang. In executable plain-text files on *nix platforms, a shebang tells the system what interpreter to pass that file to for execution. In this case, you’re passing the file to the Bash interpreter. This will allow each successive line to be executed as commands, in order.
The first command in the file, xrdb $HOME/.Xresources, tells VNC’s GUI framework to read the server user’s .Xresources file. .Xresources is where a user can make changes to certain settings of the graphical desktop, like terminal colors, cursor themes, and font rendering. The second command tells the server to launch Xfce. Whenever you start or restart the VNC server, these commands will execute automatically.
Save and close the file after adding these lines. If you used nano, do so by pressing CTRL + X, Y, then ENTER.
To ensure that the VNC server will be able to use this new startup file properly, you’ll need to make it executable:
chmod +x ~/.vnc/xstartup
Copy
Then restart the VNC server:
vncserver -localhost
Copy
Notice that this time the command includes the -localhost option, which binds the VNC server to your server’s loopback interface. This will cause VNC to only allow connections that originate from the server on which it’s installed.
In the next step, you’ll establish an SSH tunnel between your local machine and your server, essentially tricking VNC into thinking that the connection from your local machine originated on your server. This strategy will add an extra layer of security around VNC, as the only users who will be able to access it are those that already have SSH access to your server.
You’ll see output similar to this:
OutputNew 'X' desktop is your_hostname:1

Starting applications specified in /home/sammy/.vnc/xstartup
Log file is /home/sammy/.vnc/your_hostname:1.log
With the configuration in place, you’re ready to connect to the VNC server from your local machine.
VNC itself doesn’t use secure protocols when connecting. To securely connect to your server, you’ll establish an SSH tunnel and then tell your VNC client to connect using that tunnel rather than making a direct connection.
Create an SSH connection on your local computer that securely forwards to the localhost connection for VNC. You can do this via the terminal on Linux or macOS with the following ssh command:
ssh -L 59000:localhost:5901 -C -N -l sammy your_server_ip
Copy
Here’s what this ssh command’s options mean:
-L 59000:localhost:5901: The -L switch specifies that the given port on the local computer (59000) is to be forwarded to the given host and port on the destination server (localhost:5901, meaning port 5901 on the destination server, defined as your_server_ip). Note that the local port you specify is somewhat arbitrary; as long as the port isn’t already bound to another service, you can use it as the forwarding port for your tunnel.-C: This flag enables compression which can help minimize resource consumption and speed things up.-N: This option tells ssh that you don’t want to execute any remote commands. This setting is useful when you just want to forward ports.-l sammy your_server_ip: The -l switch let’s you specify the user you want to log in as once you connect to the server. Make sure to replace sammy and your_server_ip with the name of your non-root user and your server’s IP address.Note: This command establishes an SSH tunnel that forwards information from port 5901 on your VNC server to port 59000 on your local machine via port 22 on each machine, the default port for SSH. Assuming you followed the prerequisite Initial Server Setup guide for Ubuntu 20.04, you will have added a UFW rule to allow connections to your server over OpenSSH.
This is more secure than simply opening up your server’s firewall to allow connections to port 5901, as that would allow anyone to access your server over VNC. By connecting over an SSH tunnel, you’re limiting VNC access to machines that already have SSH access to the server.
If you are using PuTTY to connect to your server, you can create an SSH tunnel by right-clicking on the top bar of the terminal window, and then clicking the Change Settings… option:
Find the Connection branch in the tree menu on the left-hand side of the PuTTY Reconfiguration window. Expand the SSH branch and click on Tunnels. On the Options controlling SSH port forwarding screen, enter 59000 as the Source Port and localhost:5901 as the Destination, like this:
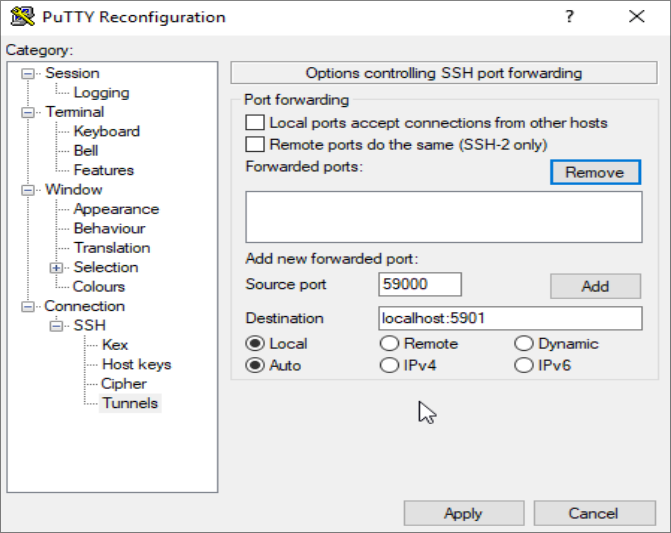
Then click the Add button, and then the Apply button to implement the tunnel.
Once the tunnel is running, use a VNC client to connect to localhost:59000. You’ll be prompted to authenticate using the password you set in Step 1.
Once you are connected, you’ll see the default Xfce desktop. It should look something like this:
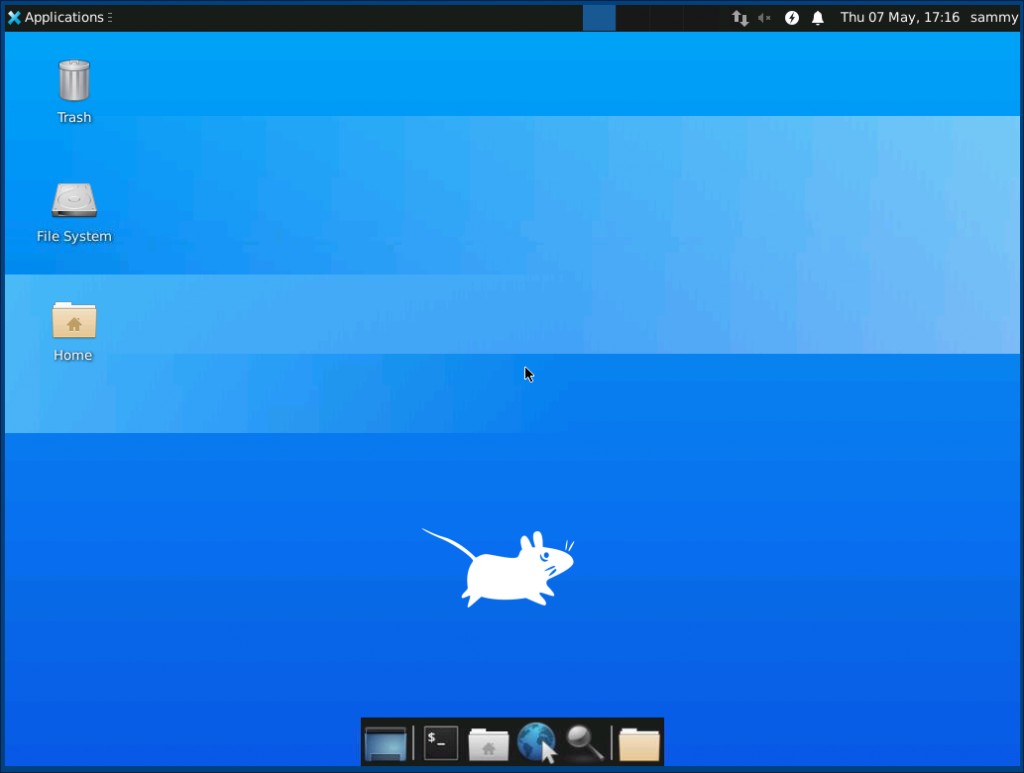
You can access files in your home directory with the file manager or from the command line, as seen here:

Press CTRL+C in your local terminal to stop the SSH tunnel and return to your prompt. This will disconnect your VNC session as well.
Now you can configure your VNC server to run as a systemd service.
By setting up the VNC server to run as a systemd service you can start, stop, and restart it as needed, like any other service. You can also use systemd’s management commands to ensure that VNC starts when your server boots up.
First, create a new unit file called /etc/systemd/system/vncserver@.service:
sudo nano /etc/systemd/system/vncserver@.service
Copy
The @ symbol at the end of the name will let us pass in an argument you can use in the service configuration. You’ll use this to specify the VNC display port you want to use when you manage the service.
Add the following lines to the file. Be sure to change the value of User, Group, WorkingDirectory, and the username in the value of PIDFILE to match your username:/etc/systemd/system/vncserver@.service
[Unit]
Description=Start TightVNC server at startup
After=syslog.target network.target

[Service]
Type=forking
User=sammy
Group=sammy
WorkingDirectory=/home/sammy

PIDFile=/home/sammy/.vnc/%H:%i.pid
ExecStartPre=-/usr/bin/vncserver -kill :%i > /dev/null 2>&1
ExecStart=/usr/bin/vncserver -depth 24 -geometry 1280x800 -localhost :%i
ExecStop=/usr/bin/vncserver -kill :%i

[Install]
WantedBy=multi-user.target
Copy
The ExecStartPre command stops VNC if it’s already running. The ExecStart command starts VNC and sets the color depth to 24-bit color with a resolution of 1280×800. You can modify these startup options as well to meet your needs. Also, note that the ExecStart command again includes the -localhost option.
Save and close the file.
Next, make the system aware of the new unit file:
sudo systemctl daemon-reload
Copy
Enable the unit file:
sudo systemctl enable vncserver@1.service
Copy
The 1 following the @ sign signifies which display number the service should appear over, in this case the default :1 as was discussed in Step 2.
Stop the current instance of the VNC server if it’s still running:
vncserver -kill :1
Copy
Then start it as you would start any other systemd service:
sudo systemctl start vncserver@1
Copy
You can verify that it started with this command:
sudo systemctl status vncserver@1
Copy
If it started correctly, the output should look like this:
Output● vncserver@1.service - Start TightVNC server at startup
     Loaded: loaded (/etc/systemd/system/vncserver@.service; enabled; vendor preset: enabled)
     Active: active (running) since Thu 2020-05-07 17:23:50 UTC; 6s ago
    Process: 39768 ExecStartPre=/usr/bin/vncserver -kill :1 > /dev/null 2>&1 (code=exited, status=2)
    Process: 39772 ExecStart=/usr/bin/vncserver -depth 24 -geometry 1280x800 :1 (code=exited, status=0/SUCCESS)
   Main PID: 39795 (Xtightvnc)
...
Your VNC server is now ready to use whenever your server boots up, and you can manage it with systemctl commands like any other systemd service.
However, there won’t be any difference on the client side. To reconnect, start your SSH tunnel again:
ssh -L 59000:localhost:5901 -C -N -l sammy your_server_ip
Copy
Then make a new connection using your VNC client software to localhost:59000 to connect to your server.
You now have a secured VNC server up and running on your Ubuntu 20.04 server. Now you’ll be able to manage your files, software, and settings with a user-friendly graphical interface, and you’ll be able to run graphical software like web browsers remotely.
We want to convert our Ubuntu 20.04.1 LTS installation from BIOS to UEFI
Before starting, we have to make sure that we have enough free disk space on the system disk (at least 1G, minimum 550MB probably will do as well)
There are many ways to
1 Make sure the current hardware support both BIOS & UEFI, and the current Ubuntu installation is BIOS
Warning!!!: Before continuing, we must make sure that we have a full disk backup, although usually this type of conversion should not cause data loss, but there are still chances that data can get corrupted, so full disk backup is necessary.
2 Follow How to Convert Ubuntu 20.04.1 LTS OS disk from MBR to GPT/GPT to MBR without losing data to convert the disk first
(MBR with extent should not be an issue and should be able to be converted to GPT successfully)
Note 1: For this guide, we assume the disk we are converting is the only disk on the system, which means it is used for storing the operating system and user data
Note 2: For this guide, boot-repair-disk is preferred over Ubuntu Desktop Live (Although, we can use Ubuntu Desktop Live then install boot-repair on the live system too)
3 Boot from boot-repair-disk again
4 Launch GParted
5 Assume we only have one partition on the disk which is used for operating system itself and user data, we resize the partition then move the block with data to the end of the slide, so that we can have 550MB unallocated space at the beginning of the disk
6 Make sure the disk (partitions are unmounted first)
Click on Resize/Move button, Click on OK button on the warning screen, Click on the green Check button to commit the changes
7 Right Click on the unallocated space at the beginning, Click on New
8 For File system, Select Fat32, For Partition name, we enter EFI System Partition, Click on + Add button
9 Click on the green Check button to commit the changes
10 Right click on the fat32 partition that we have just created, Click on Manage Flags, Click on boot (boot and esp should be checked), Click on X Close button
11 Restart the system (Boot into BIOS/UEFI)
12 Change the settings to UEFI from BIOS
13 Boot from Boot Repair USB again
14 Click on No button if asked for updating the software
15 Click on the first button “Recommended repair (repairs most frequent problems)“
16 Carefully following the steps required by the Boot Repair software
17 When the boot repair is done without error, we need to restart the system (Remember to remove the bootable USB)
18 Now we should be able to boot into Ubuntu via UEFI
1 Download Ubuntu Desktop Live or boot-repair-disk
2 Create a bootable USB from the downloaded iso file using balenaEtcher or Ventoy suggested, refer to the following guides if necessary
List of free software/programs/Utilities to write ISO files to USB HDD/Thumb Drive/Flash Drive (Create bootable USB drives) easily etc. (balenaEtcher)
Another Simple and open source Multiboot USB creation tool (Ventoy)
3 Configure the BIOS/UEFI from the system which we want to convert the disk, so that we can boot it from USB (Refer to the motherboard manual or Search the motherboard model if necessary)
(If Boot Repair is asking to update the software, click on Nobutton)
4 Launch the terminal from the live system
5 We use the following command to convert the disk from MBR to GPT
(If gdisk is not installed, use sudo apt install gdisk to install it first)
sudo apt gdisk /dev/sdx
Note: Replace /dev/sdx with the correct disk label e.g. /dev/sda, /dev/sdb etc.
Output
GPT fdisk (gdisk) version 1.0.5
Partition table scan:
MBR: MBR only
BSD: not present
APM: not present
GPT: not present
***************************************************************
Found invalid GPT and valid MBR; converting MBR to GPT format
in memory. THIS OPERATION IS POTENTIALLY DESTRUCTIVE! Exit by
typing 'q' if you don't want to convert your MBR partitions
to GPT format!
***************************************************************
Command (? for help):Enter w to convert MBR to GPT partition Enter y to confirm and write the change
Enter r to enter the recover and transformation
Enter g to convert GPT to MBR partition
We can enter p to check the partitions.
Warning: We will lose our bootloader like grub, which means we will have to reinstall/fix the bootloader/grub etc. after the conversion, we can use boot-repair-disk from Step 1 to fix it easily by following steps prompted by the software